I Don’t Know About You.. But My Sister’s Turning 22!

Today one of the most beautiful, inspirational, creative, talented, loving, supportive, encouraging, and down right fun women I am blessed to know.. and even more blessed to call my sister and one of my best girlfriend.. turns 22 years young! Today is a special day because 22 years ago Catherine Paige Herron came into this world and graced everyone with her presence! Today 22 years ago I was given one of the greatest gifts a woman can ever be given, a sister close in age, two and a half years apart to be exact. Someone to share clothes, makeup tips and hair ideas with. Someone to tell stories to and hear their stories in return. Someone to try out for the Tennis team in high school with even when you know you’re going to down right stink! Someone who understands what it’s like being raised by the same parents and be in the same family. Someone to take drives during the summer time with while dancing and singing along in the car to your favorite songs. Yes, we really do that still to this day, and even worse we once caught a man in the car next to us intentionally driving the same speed so he could dance and sing along with us lol.. it really happened and that story is for another time and place.

There is no other bond in the world like a sister close to you in age. No other person who has simultaneously watched and went through the stages of life with you  from such a close perspective. They don’t just sympathize or empathize with you on things, they literally know what it is like. They don’t just listen to your memories or remember things because they were told about it later on in life. No they remember vividly for themselves. They don’t need to be told about it because they were there, right by your side experiencing it for themselves as well. They remember the funny jokes, the frustrating times, the happy moments, the stressful situations. They remembers the good ideas and the bad ideas, and they also remember being there to share in the responsibility of it all.. because they were there, not as an older or younger sibling, not as a friend or a parent but as a partner in crime, so to speak. Someone who was in the thicket of if all with you, and that is the blessing of having Paige as my sister, someone so close to me in age and spirit, bonded to me through the moments that life handed to both of us and the honor we have had to face those moments together!

A few recap’s of my favorite moments through out the 22 years we have spent together as sisters and friends side by side!

 

The best maid of honor in the entire world, my sister!
Say what sister?!?!
Say what sister?!?!
Posh!
Posh!
Strike a pose before prom!
BIG BURRITO'S at Chipolte for Halloween! We dressed up like housewives
BIG BURRITO’S at Chipolte for Halloween! We dressed up like housewives
Out at The Pomeroy Family Farm for a summer bonfire night!
Family reunion
Family reunion

323069_2470455524843_1388821918_o


Catching the bouquet at our wedding!
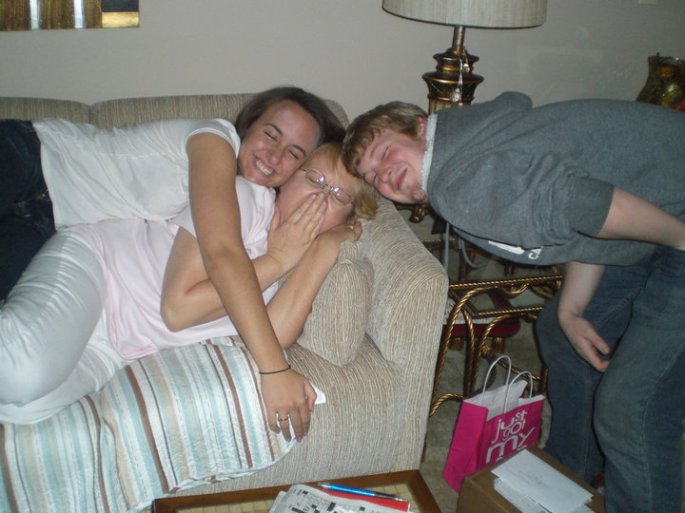
hugs for our sleeping mama
Sister love!
Sister love!
Sombrero for two
Sombrero for two
Kirby kisses!
Kirby kisses!

942316_10201480746604666_969289422_n


Paige's graduation!
Paige’s graduation!
Cooking up a storm for Thanksgiving!

150875_1756482235957_4955089_n

Cousins at Christmas
Bachelorette, she did a fantastic job planning a fantasticly fun girls night!
Her 21st!
Her 21st!
With the men folk
With the men folk
Holding little Vienna Sausage!

1006340_10202975535693459_2035319501_n

Fun photo bombing!
Fun photo bombing!
Celebrating her 22nd birthday!
Happy 22nd Birthday Katie-Paige!

We love you Katie- Paige and wish you the happiest 22nd birthday in the entire world!

Your brother & sister,

Matt & Blair


Resurrection Day

Long before The Easter Bunny, Easter Egg Hunts and Jelly Beans there was a man who lived and died over 2000 years ago. Long before we sang about Peter Cotton Tail or looked forward to buying a new Easter dress to wear to church on Easter Sunday that same man gave up his innocent life so that we could find complete and total freedom from all of our sin in His perfect sacrifice. That mans name is Jesus, the son of God, the one true Messiah. He is our hope. He is our redemption.

The celebration of Easter is so much more then what we make it out to be. It is so much more important then what we give it credit for. Easter is the day we remember how we came to be free thanks to the promise that was fulfilled through Jesus when He was resurrected from the grave three days after taking our punishment upon His self. But death did not defeat Him and that is why we rejoice 200o years later! Because of Jesus’ victory over our death and sin we can live renewed in the truth that He paid the price so that He could offer us the most beautiful gift of love; eternal life with Him! John10:25-26 Jesus said unto her, I am the resurrection, and the life: he that believeth in me, though he were dead, yet shall he live:
And whosoever liveth and believeth in me shall never die. 

This gift has nothing to do with us. Whether we choose to believe and accept it does not change the fact that Jesus still bought it for us and wants to give it to us. We could never pay Him back for it, or purchase it on our own, it is simply offered to us. This precious gift is unconditional, just like Jesus’ love for us. That means after believing in and accepting salvation through Christ there is nothing in your past, present or future , no inward or outward mistake, no big or small sin, no blatantly disobedient or obliviously ignorant wrong doing that one can ever commit that would make Jesus take back His gift. He is not an indian giver because the gift has nothing to do with the receiver, instead it has everything to do with the precious price He paid, His sacrifice, and His sweet blood that covers all! Not partially all. Not all, up until  the day you became saved or the day after your salvation. Not only the little things or only the biggies. ALL! Meaning everything and anything that you did, could or will possibly do! ALL! His grace, His blood, His sacrifice, His gift of loving salvations covers all! It covers the rebellious. It covers the oblivious. It covers the ignorant. It covers the in denial. It covers to negligent. It covers the inwardly unknown and the outwardly obvious. It covers the little mishaps and the big mistakes. It covers what we make excuses for or try to justify. It covers what we can’t stop guilt tripping ourselves about. It covers whatever happened before we accepted salvation, whatever we are in the midst of at the moment, and all things afterward.

And that is what makes it true grace, because we are so undeserving of it, even after we accept salvation each and everyone of us are still completely unworthy and only through His sacrifice are we all covered!

So this Resurrection Day, and all to come, that is what we are celebrating in The Pomeroy home. The most sweet, sacrificial act of love ever known to mankind through the cross, and the blessing we have in receiving such saving grace because our redeemer lives!

Praying you have a renewed and refreshed Resurrection Day with all those who are loved in your life!

Much Love & Prayer,

Matt & Blair

DIY Chalkboard Family Meal Board for under $10

For quite sometime now I have been wanting to create a family menu board so that Matt and I can write down what we plan out for a specific weeks dinner menu and be able to remember it some place other then in our heads. As I am sure you can imagine, keeping track of how you mean to use your groceries for a whole week can be rather difficult when you are relying on your own brainpower to do so. We also thought it would be a fun way to keep us engaged and looking forward to that special meal we share together every night right now in the present as well as in the future once our family begins to expand.

The only problem is I am a bit picky when it comes to crafting things as well as really thrifty with our finances. I had seen a lot of cute ideas on Pinterest but none of them quite fit the bill for what I was dreaming up. They were either really cute, but not functional enough, or really functional, but not cute enough! Isn’t that how life seems to work sometimes? If you rush into things you end up settling for one need versus another, but patience will always take home the prize! Thankfully I was patient and decided not to settle for a quick fix, but instead waited it out in the long hall.

Last, summer Matt and I were living in Lexington. The street we were living on held a collection of old homes and on my way home from nannying one day I just happened to notice that one of the homes being remodeled was getting a full set of brand new windows, which meant I had hit the goldmine of old vintage ones! I asked the owners if they would mind me taking them and of course they were happy to feed my crafting addiction since that meant they didn’t have to worry about the trash collection picking them up etc.

After some deliberation about what I should do with them, I decided to use one of them to make a family dinner menu board. So here it is. How I was able to take an old vintage window and up-cycle it into a family menu board!

Supplies:

  • One six paned vintage window
  • Masking tape
  • Paint color of your choice
  • Chemical Stripper
  •  Metal tray
  • Cheap Sponge brushes
  • Paint stripping tool
  • gloves
  • Thin and think paint brushes
  • Paper towels
  • Glass cleaner
  • Plastic drop clothe
  • Chalk
  • Wooden Block Letters
  • Pencil
  • 150 grit sandpaper
  • Sander
  • Picture hanger set
  • Chalkboard paint – recipe to create your own can be found here: homemade chalkboard paint

Directions:

  1. Set up your work space. Make sure that the drop clothe is covering all surfaces of space that you want to keep clean.
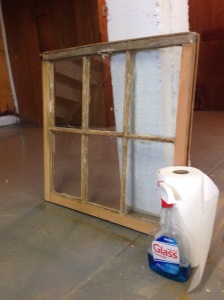
  2. Begin by cleaning off window panes with glass cleaner and any dirt or debris off of the windows wooden frame.
The begin before it was transformed!
  1. Use the masking tape to tape the edges of the paned glass, so that the stripper does not destroy the glass. I found out later that this is not necessary, but it’s still a good idea.
Getting ready to begin stripping!
  1. Put on your gloves so that you do not get any stripper on your hands. Shake the chemical stripper well and pour it into the metal tray.
  2. Using the cheap sponges brush the stripper onto the wooden frame. Make sure to only go in one direction. Allow it to sit for the amount directed on the instructions. For me this was 30 minutes.
  3. Using the paint stripping tool, strip the paint off of the window frame in a downward motion.
  4. Repeat the chemical stripping process (steps 4-6) until the window frame is almost completely clear of all paint residue.
  5. Peal the masking tape off of the window panes and repeat this process (steps 1-8) on the opposite side of the window.
All finished with the first phase!
  1. Next take the sander and sand paper and sand the windows wooden frame until it is smooth. Side note you will have to sand the inside of the panes by hand.
  2. Once again, using the paper towels and glass cleaner, clean the window panes of any chemical stripper or paint residue.
Squeaky clean!
Squeaky clean!
  1. Now take the masking tape and secure the inside of the window, creating a barrier between the frame and the glass. This will ensure that paint does not leak through onto the glass panes.
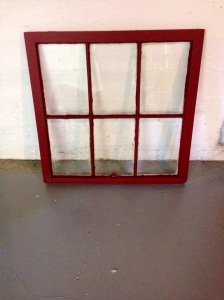
Ready to begin painting!
  1. Mix up your paint and, using the thicker paint brush, cover the entire frame with the paint. Allow it to dry and repeat this step until it is the shade you desire. For me that was about two, well applied, coats.
Matt and I chose a deep, warm red to go along with the color scheme we chose for the kitchen.
  1. Pull off the masking tape and reapply a fresh set of tape on the opposite side of the barrier you created.
  2. Now take your homemade chalkboard paint, which you can find directions to make here, and using the thin painting brush apply the chalkboard paint to each window panes edges. Then once you have created a even edge of paint use the thick paint brush to go back a fill in the rest of the window panes surface. Make sure you have previously rinsed out and allowed the thick brush to dry before painting with it. Allow chalkboard paint to dry and apply as many coats as necessary to achieve the desired shade of color.
  3. Peel off the masking tape from the panes edges.
Ready to be written on!
  1. Now take the sand paper and sand the chalkboard paint pane down until it is smooth.
  2. Season the Chalkboard paint by rubbing chalk over the surface and wiping it off. Now you are ready to write on the board!
  3. Begin by taking the wooden block letters and using them as a stencil to outline with a pencil. Once you have done this trace over the letters with chalk.
The days of the week have been added!
The days of the week have been added! Make sure to decided if you like the outlined look or the letter completely filled in. We chose to go with the outline because that is the one Matt liked best and I decided to let him have final say. 🙂


  1. Now take the picture hanger set and have your handy husband apply it to the back of the frame.
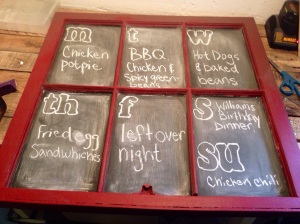
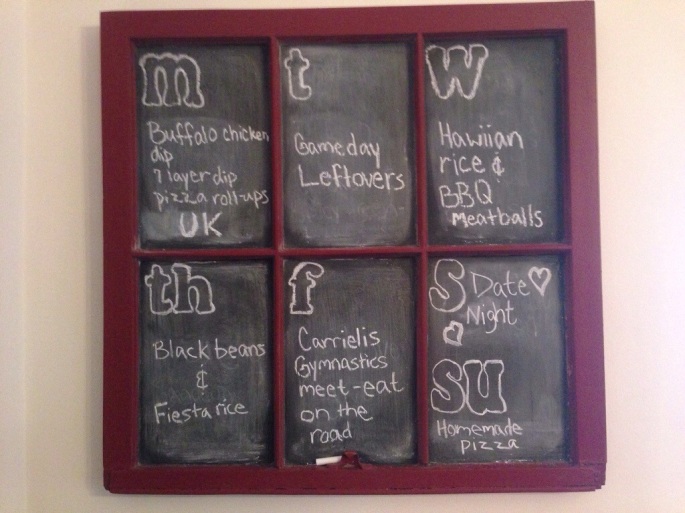
  2. Lastly decide together as a family what you will be enjoying during dinner as you share in the joy of one anothers company. Using chalk write it down in the squares under the appropriate letter dictating the day of the week that specific meal will be made and hang it up in a visible spot for all to see!
Ready to be displayed!
Final product being used for the exact reason it was repurposed!


On a side not if you choose to make this menu board it can be a little time consuming, so have patience, take it one step at a time, and remember there is always tomorrow. I hope this post inspires you to begin crafting for the greater good and enjoyment of your family!

Much Love & Prayer,

Blair

Homemade Chalkboard Paint

Recently, for a home project, I was looking into the cost of chalkboard paint vs. making my own version. I really didn’t need a whole gallon, which was all I could find at the hardware store and for that matter I really did not want to pay the extra money for something that possibly would sit around in my basement and go bad. Therefore, I found this recipe to make chalkboard paint myself and since I already had 1/2 of the ingredients needed it was a winning idea! All I had to do was buy the color paint I wanted and presto!.. Instant, homemade, easy to make, easy to use Chalkboard paint! Thought I would post the recipe I used here for any other DIYer’s who have decided to go the homespun route with their own Chalkboard inspired projects! 🙂

The ingredients!
The ingredients!

Ingredients:

  • 1 cup (8 oz.) paint
  • 2 tablespoons unsanded tile grout

Directions:

  1. Open the lid of the 8 oz. paint sample jar and add 2 tablespoons unsanded tile grout.
  2. Now shake extremely well and until all the grout is completely mixed in with the paint.
  3. Apply to project as you would normal paint and sand the surface by hand with sand paper after application is completely dry.
  4. Make sure to season the dried chalkboard paint by swiping some chalk over it and then wiping it off!
Chalkboard paint dried and in use!

Good luck on your own DIY adventures!

Much Love & prayer,

Blair